 for transfer to the cabin at the end of the EVA. Note, also, the orange decal on the top showing f-stops to be used for photography in various directions relative to the Sun. Note, also, the wire handle on the lefthand side attached to dark slide that was in place whenever the magazine wasn't attached to the camera. In the case of this magazine, the dark slide was removed early in preparations for the EVA, just before the magazine was attached to the EVA Hasselblad. The dark slide was then stowed in the LHSSC (Left Hand Side Stowage Compartment and wasn't inserted again until the magazine was transferred back up to the cabin on the LEC at the end of the EVA. October 2004. Photo by Ulli Lotzmann at the National Air and Space Museum.")
WIKIARCHIVES.SPACE
The Human Spaceflight Archive
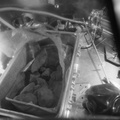
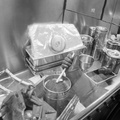
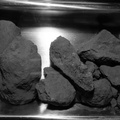
View of the back, top, and lefthand side of the Hasselblad magazine used by Neil Armstrong and Buzz Aldrin during the Apollo 11 EVA. Note the hook on the back that was used to attach the magazine to the Lunar Equipment Conveyor (LEC) for transfer to the cabin at the end of the EVA. Note, also, the orange decal on the top showing f-stops to be used for photography in various directions relative to the Sun. Note, also, the wire handle on the lefthand side attached to dark slide that was in place whenever the magazine wasn't attached to the camera. In the case of this magazine, the dark slide was removed early in preparations for the EVA, just before the magazine was attached to the EVA Hasselblad. The dark slide was then stowed in the LHSSC (Left Hand Side Stowage Compartment and wasn't inserted again until the magazine was transferred back up to the cabin on the LEC at the end of the EVA. October 2004. Photo by Ulli Lotzmann at the National Air and Space Museum.


Information
- Taken in
- Other
- Author
- Ulli Lotzmann
- Description
-
View of the back, top, and lefthand side of the Hasselblad magazine used by Neil Armstrong and Buzz Aldrin during the Apollo 11 EVA. Note the hook on the back that was used to attach the magazine to the Lunar Equipment Conveyor (LEC) for transfer to the cabin at the end of the EVA. Note, also, the orange decal on the top showing f-stops to be used for photography in various directions relative to the Sun. Note, also, the wire handle on the lefthand side attached to dark slide that was in place whenever the magazine wasn't attached to the camera. In the case of this magazine, the dark slide was removed early in preparations for the EVA, just before the magazine was attached to the EVA Hasselblad. The dark slide was then stowed in the LHSSC (Left Hand Side Stowage Compartment and wasn't inserted again until the magazine was transferred back up to the cabin on the LEC at the end of the EVA. October 2004. Photo by Ulli Lotzmann at the National Air and Space Museum.
- Created on
- Albums
- US SPACE PROGRAM / APOLLO / APOLLO 11 / Post Flight
- Source link
- https://history.nasa.gov/alsj/a11/images11.html#Post
- Visits
- 53
- Rating score
- no rate
- Rate this photo
- License
- CC BY-NC-ND
- Modified by WikiArchives
- No (original)
- Downloads
- 0
Powered by Piwigo